A Handmade Christmas
Each holiday season I am sadly reminded of how our beautiful Christmas presents arrived under my tree. Most of our company made gifts are made overseas by people who are in sweat shops and poorly paid. Beyond that you have the health factor to consider as well. As a new momma I am constantly researching the origins of my babies' items. Remember a few years ago when the media reported that children’s toys had lead paint!?
This year we have more than our usual child labor and lead paint to consider, with the increase in support to the Occupy Wall Street efforts, I began to reconsider my approach to this joyous holiday. Why would I give money to support companies who are corrupt? I would much rather support a stay at home momma like myself who uses the profits to support her family. This final thought forced me to take a fun challenge, a completely handmade Christmas.
I divided this blog post into two sections, this first part is how to do a handmade Christmas yourself even if you are not particularly artistic! The second part is how to find some wallet-friendly artists to make your gifts for you.
Beeswax Candles
These are easy to make and make wonderful gifts! Here are some reasons to go with beeswax over other waxes.
1. Beeswax is a clean burning wax that does not ruin the air quality in your home.
2. It makes your house smell wonderfully of honey
3. Save money and the planet by conserving energy with a little mood lighting
4. Low impact, high reward
Before I began this project I knew that I wanted fresh, raw wax from a eco-minded bee keeper. After some research I found Owl Naturals on Etsy.
So here is how to create your very own candles in 8 simple steps.

Step 1 - break your beeswax into smaller pieces and place them in a glass bowl or cup
Step 2 - place the cup of wax pieces in a pot filled with water, make sure the cup weighs more then the water so it will not tip over!
Step 3 - bring the water to a boil and then lower the temperature to a medium setting, let the wax melt slowly and wait until all the pieces are melted before moving on.
Step 4 - while the wax is melting cut the right length of wicking for the mold you want to use. Dip the wick once in the wax to give it a single coat, this will prevent the wick soaking up the wax for the candle.
Step 5 - if you are not planning on burning the candle in the mold then you must rub a tiny bit of oil on the inside of the mold so the candle will release from the sides.
Step 6 - place a tiny dot of wax at the bottom of your mold and stick your wick to the wax by using a stick of some kind, I used a BBQ kabob stick. Now place another stick across the top of the mold and use a bobby pin to hold the top of the wick to the stick. This will prevent the wick from slipping down while the wax cools.
Step 7 - carefully pour the wax into the mold in one motion, do not pause or you will get a crack in your candle. Make sure that the wick is still position in the middle of the candle and let it sit for a few hours.
Step 8 - remove the bobby pin and stick, turn the mold upside down and gently hit the bottom of the mold so the candle will fall into your hand. If it does not come out you can push down on the candle gently to break it away from the walls.
Dish Towels and Burp Cloths
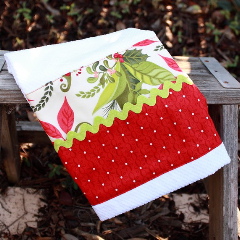
Even people that are all thumbs at a sewing machine can pull off this craft project! Your local fabric store will have some soft and fun options for terry cloth and you can also pick out some fun cotton patterns you think your gift receiver will enjoy. Use a dish towel or burp cloth you already have to measure the size and cut out your rectangles. When you are finished cutting the terry, cut a skinny rectangle of your cotton fabric. Iron the edges of the cotton fabric back on itself so your cut edge is hidden under the square and sew the rectangle on to the terry. When you are finished roll the edge of the terry twice so your edge is hidden and sew all the way around the cloth. If you want to cheat a little most craft stores have plain dish cloths with clean edges that you can purchase and decorate from there.

This part was supposed to be do it yourself but if you like these ideas and still don’t want to do the candles and towels yourself, here are links to some shops where you can buy these gifts!
Candles - www.owlnaturals.etsy.com
Towels - www.terrancehill.etsy.com
I hope this inspires you to make some gifts yourself! Happy Holidays
 :)
:)


I couldn't agree more when it comes to feeling sad when thinking about the source of most Christmas "joy" for kids these days. After watching "The Story of Stuff", my ways have changed a lot. Your work is beautiful Anya! Merry Christmas!
ReplyDeleteYikes! Bad grammar is like fingernail-s on the blackboard-! If anyone really cares, Chaz and Nancy Grace still annoy me.Tera gold
ReplyDelete