Showing posts with label Merry [home] Making Series. Show all posts

Thursday, December 15, 2011

Merry [home] Making Series: Christmas Gift Tags

It's the last day of my Merry [home] Making Series!  My guest blogger for today is Jenny of Notes from the Plumb Tree.  I came upon Jenny's blog pretty randomly over a year ago when I fell in love with her shoes.  Jenny creates the most beautiful little shoes I've ever seen, and sells them in her shop on Etsy.  Since then, I've come to love not only her shoes, but also the sweet little family she shares about on her blog.  Seriously, Hunter, Ainsley, and Tessa are some of the most adorable kids.  On the planet.  And I really appreciate how she is raising them in a Christ-minded way.  It makes me excited to be able to share things with Kayleigh, someday!  I hope you enjoy her post, and please go send some love over at Notes from the Plumb Tree!


Christmas Gift Tags


Thank you so much, Bethany, for having me as a guest blogger.  Bethany has become a bloggy friend of mine and we have been blogging back and forth for over a year now and I am honored to be posting here.  I am a crafting Momma of three littles so that means blog posts are quick and full of the ramblings that go with mothering three crazy monkeys who are constantly up to something while I am in the middle of creating.


This week I enlisted their help in making Christmas gift tags.  Every year I save the Christmas cards that come in the mail in a ziplock bag.  The next year I break them out and make them into gift tags.
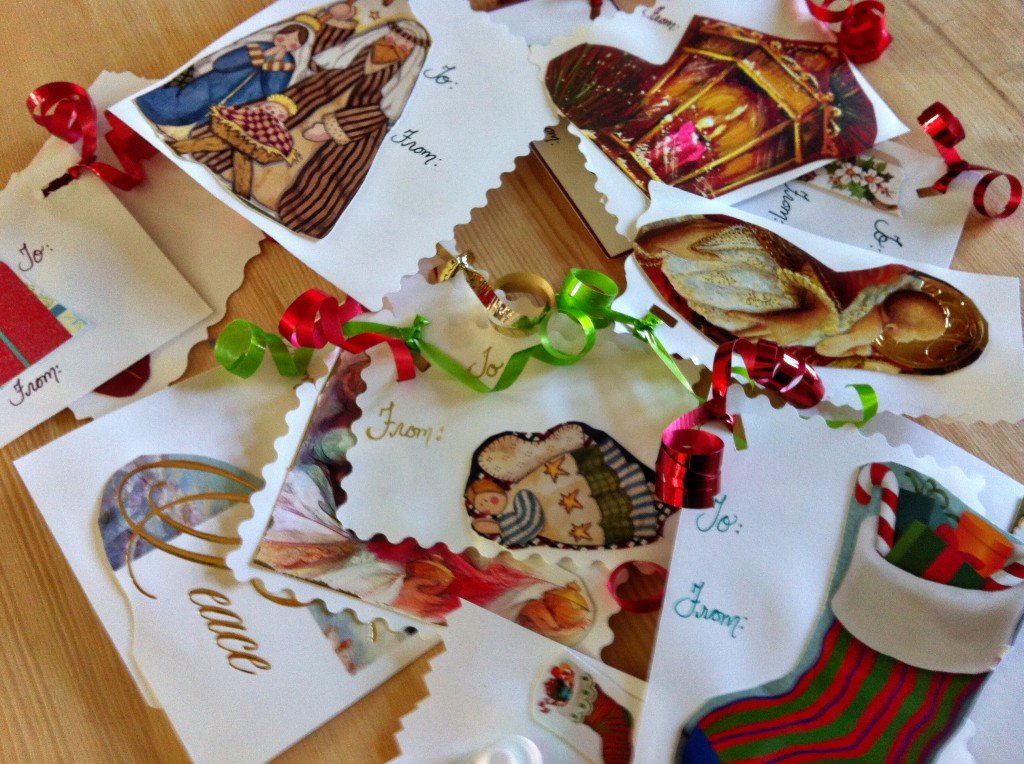


I hate throwing such pretty cards away, so they get repurposed and the pretty pictures on the front are cut out.  One card can often make several tags as each pretty piece is cut out separately and glued onto squares of cardstock.  Then I punch a hole in the corner and put some pretty curly ribbon through.  Sometimes I glue on buttons as well.  The kids were recruited this year. (You can read this as the tags are going to look a lot more "homemade" this year and we skipped the buttons, haha!). They helped chop up cards and glue the pictures down on cardstock.  I punched holes and put on the ribbon.  Hunter wrote "To" and "From" on many of them.


As you can see, we craft very neatly don't we?  Anyhow, it was also fun to read who sent us cards last year and think about them again.  One especially poignant  moment was when I found the card my grandpa sent last year.  He passed away in February.

Because I enlisted the help of my children, I thought I also might want some more "grown up" tags for prettier gifts that I may be giving away outside the family.  These next few are my "big girl" tags.  They are made of cardstock and paper doilies you find in packs at the Dollar store along with some twine.  I thought they would be cute with brown paper wrapping.  It's sort of a vintage theme.


I fortunately have a sizzix machine that cuts out tags, but you could use regular tags bought at the store. Also, I needed to craft with my gingerbread tea in a holiday mug and Christmas candles.  Don't forget that.  It's part of the crafting ambiance.  Yes, I'm sure the kids are creating chaos somewhere, but in my little crafting bubble of tea and gingerbread candles, peace reigns supreme.  Yes, I like my tea strong and leave the tea bag in and also put a good dosing of holiday coffee creamer.  Pure crafting bliss. Anyhow...Here I am mid-craft gluing on doily edges to the bottom half of the tags.


And Ta-Da!  You have some cute little vintage looking tags for some brown paper packages.  It reminds of "brown paper packages tied up with string".  Anyhow, they are simple, neutral, and vintage.


Thanks so much for hosting me, Bethany!  Merry Christmas from our chaotic crafting house to yours!

Tuesday, December 13, 2011

Merry [home] Making Series: Fabric Gift Bags

It's day 3 of my Christmas Craft Series, "Merry [home] Making," and I'm very excited to get to introduce to you my wonderful blog friend, Megan of  The Sandefur Family.  Megan is a sweet and talented woman who is working hard on renovating her home with her husband, Addison.  She shares their day-to-day victories with their house, moments spent with family, and craft endeavors.  She always leaves the sweetest comments on my blog, and is such an encouragement to me! Please be sure to go visit her site and say hi!

 Fabric Gift Bags


I’m Megan from The Sandefur Family and Bethany has asked me to guest post today!  When she contacted me to see if I’d participate in her DIY series I was flattered!


So, today I’m going to share how I make small fabric bags for wrapping jewelry to give as gifts.  My mom suggested that I stitch up these little bags for gift giving earlier in the year and they’ve been a hit!  This project falls on a novice/beginner level and I love the instant gratification!


My favorite thing about this little project is that the bags can be made from scraps of fabric that are on-hand and I don’t have to buy a single thing.  I stack four pieces of fabric together and cut out a rough template.  I cut at least two patterns out at a time to make the process faster.  Since I leave the edges rough, I often come back and trim a second time after the bag has been stitched together to make it look a bit neater.

After the pieces have been cut, pair them and pin in two places to keep them together.

Then stitch around the circular portion of the material to make a small bag, making sure to leave enough room for a hand to slip down inside and retrieve whatever is in the bag.  This is where I trim around the circular portion of the bag a second time to clean it up a bit.


Trim the ties diagonally in opposite directions.


And you’re done!


Easy, right?  If you’ve got the time you can make dozens of these little bags for gift giving.  I've made quite a few this year and love all the possible fabric combinations.  Now go put them under your tree!


Merry Christmas!

Monday, December 12, 2011

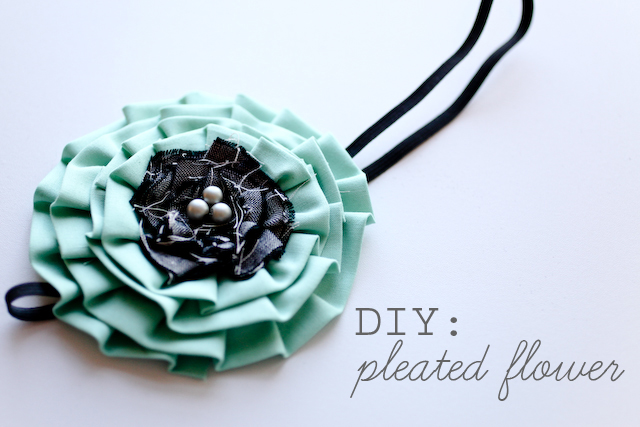
Merry [home] Making Series: Pleated Flower

Welcome to Day 2 of my Christmas Craft Series, Merry [home] Making!

Today, I'm very excited to introduce you to Whitney of Elm Street Life.  Whitney's blog is one of my favorite respites.  Whenever I need to just sit in front of the computer and be refreshed, I love clicking to her site to look at her beautiful pictures, read about her life with her husband Shawn, be inspired by her beautiful DIYs, and be continually reminded through her words about the love my Savior has for me.

I was tickled pink when she agreed to do a DIY for my Christmas series!  I hope you are inspired.


Hi to Bethany's sweet readers! I'm Whitney from Elm Street Life and I am honored to be here with a really easy DIY that is so versatile.


Here are the supplies you'll need:

Fabric scraps in two colors (You only need a maximum 1/8 yard of two different fabrics)

A small piece of felt for backing

Pearls or beads for the center

Sewing needle

Sewing machine

Iron

Scissors

Elastic (optional)


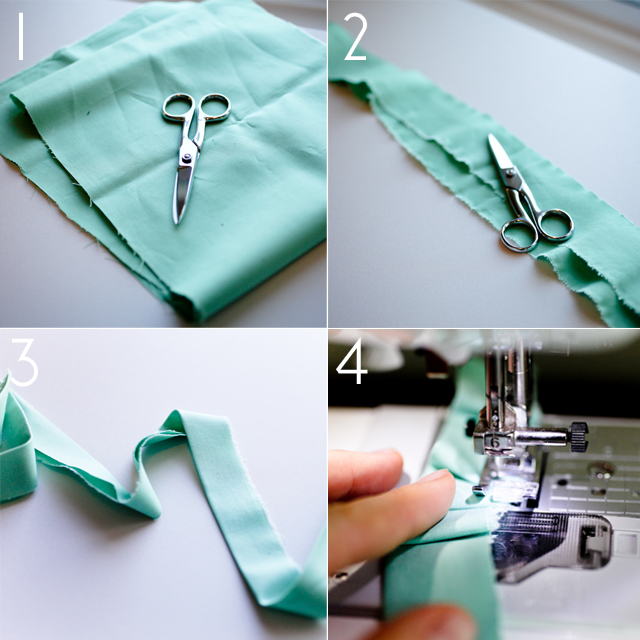
1. Choose the fabric you'd like to use for the outside of your flower.

2. Cut a strip or two out of your outside fabric that's approximately 2 inches wide.

3. Fold your strip in half lengthwise and iron so you have a crisp edge.

4. Sewing along the raw edges of your fabric, pleat your fabric as you sew. I just push the fabric under right before it goes under the needle, about every 5 to 10 stitches. The pleats don't have to be perfectly even at all.


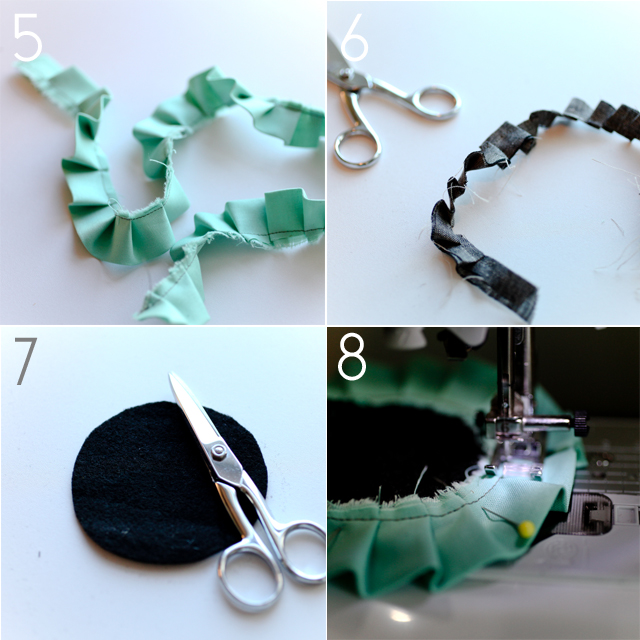
5. Once you've pleated, this is what you should have: a strip or two of pleated outside fabric with the folded edge on the outside.

6. For the inside fabric color, repeat steps 1 through 4. I really liked the frayed look of this gray fabric so I chose to leave the raw edge on the outside, but it's up to you!

7. Cut a circle out of felt (for the backing) approximately 3" across.

8. Pin your pleated strip to the outside of the felt circle and sew along the original stitch line. Repeat until you go around the circle at least 2 or 3 times.


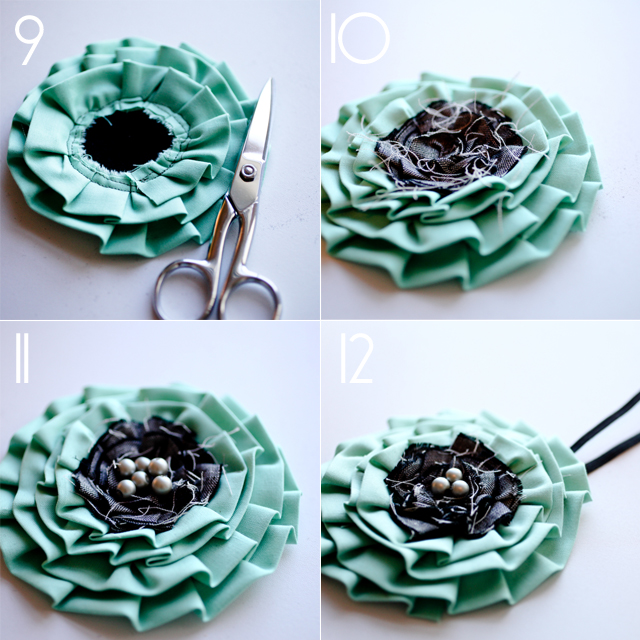
9. At this point, you should have 2 or 3 layers of pleated rows.

10. Using the same technique, add the other color to the inside.

11. Choose which color beads/pearls you'd like to use. I chose a soft gray pearl for this one.

12. Hand sew the beads or pearls to the inside of the flower and you're done! The options are endless once you've finished your flower. Add a piece of elastic, like I did, by hand sewing a piece of elastic to the back of your flower. Or hot glue a pin onto the back and wear it on your shirt, purse, or scarf!


Merry Christmas to you!


[be sure to visit Whitney's Etsy shop,  Brighter Day.  10% of her proceeds go toward bringing justice to victims of slavery, sexual exploitation and other forms of violent oppression.]  Thank you, Whitney!

Sunday, December 11, 2011

Merry [home] Making Series: Christmas Bunting Banner

Welcome to the first day of my Christmas Craft Series, Merry [home] Making!  I'm so excited to be doing this for the second year in a row, and very pleased to have so many wonderful crafters/bloggers sharing their ideas with you this week.  It's going to be a lot of fun!

My first guest blogger is Bonnie, a sweet wife, and mother to her beautiful little Elora.  I met Bonnie when her husband's childhood friend married my childhood friend last year.  We discovered that we both love crafting and blogging, and have been blog buddies ever since.  Bonnie is an incredible seamstress, and makes beautiful little outfits for her daughter.  She also enjoys making custom orders through her Etsy shop, so if you need a special outfit, a pretty bag, a cute bow tie for your little guy, or a headband for your sweetie pie, be sure to talk with her!


Scalloped Christmas Bunting Banner


Hello, Happy Homemaker Me readers, my name is Bonnie and I am so glad to be here on Bethany's blog today, what a privilege! Normally, you can find me over at The Pretty Bitty Blog, but today I'm posting my very first tutorial here on Happy Homemaker Me.

I am going to show you how to make a fun little Christmas bunting banner.


First, gather up some supplies.

To make a "Joy to the World" banner, here's what you'll need:

16  3"x3" squares of fabric for the front- I used 5 different prints, so I had 4 squares of one print, and 3 squares of all the others

16  3"x3" squares of backing fabric- I used a white cotton

55" of 1/4" double fold bias tape

Letter stamps

Acrylic Paint- I chose silver

Glitter- if you want some sparkle

Paint brush

Rotary cutter, mat, and ruler

And the sewing basics: sewing machine, thread, scissors, iron

Now let's get started! Once you've cut all of your fabric squares, you need to round the bottom of each piece to give it that cute little scalloped look. If you're really good at eyeing things like this, you can do that, but, I am horrible at it. So I always find something laying around with the shape I need, sometimes it's a cup, sometimes a plate, this time, a spool of ribbon.


Place the round item of your choosing on one of the squares and trace around it, then cut on the line. Use this piece of fabric for the template to cut the rest of your scallops. I cut through 3-4 at a time to speed things up.

Next, assemble each flag, placing one print fabric and one backing fabric right sides together.


Using 1/4" seam allowance, sew around the edge of each flag leaving the top open for turning.


After you've sewn all of the pieces, you'll need to clip the rounded part of each little flag. If you have pinking shears, they work great for this! Just cut all the way around the scallop close to the stitches, being careful not to cut into the stitching. If you don't have pinking shears, you can do this the proper way. Using some sharp scissors, cut little Vs all around the curve on the bottom of the flag. Clipping the curves, whether with pinking shears or the V cuts, removed the excess fabric that would get bunched up in your nice little curve when you turn the flags right side out.


Now we're going to turn each flag right side out and press them. Then lay the flags out in the order you want them in for the banner.


Once you have them all put in order, pick up the first one and stack each proceeding flag beneath it, in order. You want to keep them in the right order so that when you sew them on you don't have to think about what goes where, just take off the top of the pile as you assemble the banner.


Take your bias tape and, using a small zigzag stitch, sew about 5 inches, then, with your needle still in the fabric, lift the foot of your sewing machine and place the first flag in the fold of the bias tape. Make sure it's nice and snug at the top crease.


Then, continuing with the zigzag, sew over the flag, just stopping short of the edge. With your needle still in the fabric, lift the foot and place the next flag into the fold of the bias tape. Once again, make sure it's snug at the top crease and also with the flag before it. Continue this process until all of your flags are attached to the bias tape.


And now, we stamp! I'm using some foam stamps, but you can use rubber stamps too, just make sure you wash it really well right after so you don't run in to problems with paint on your stamps. Using the paint brush, apply a liberal amount of pant to your stamp. The fabric wants to absorb the paint so you need to use a lot (and you might want to put some paper under the banner to protect your work surface while you're working with the paint). Carefully stamp each flag with the appropriate letter. It works well if you hold the flag down with a few fingers from one hand while you stamp the letter with the other.


Once you've stamped the whole banner, the first letters should be dry enough to tell whether you need a paint touch up. Due to the fabric absorbing the paint, you will probably need to do a bit of touch up work. Use a paint brush to fill in where needed. After you touch up a letter, sprinkle a bit of glitter on it. I wanted my letters to be slightly sparkly but not thick with glitter so I just sprinkled a "pinch" over each one.


Now, just wait for your banner to dry and find a lovely place to hang it!


Thank you for allowing me to share this tutorial with you. I hope you enjoyed it. Have a very merry Christmas!


Many thanks to Bethany for hosting this holiday series and allowing me to be a part of it! Thank you!

Saturday, December 10, 2011

Merry [home] Making Series

I'm so excited!  My second year of Christmas Craft tutorials begins tomorrow!  I have some wonderful crafters/bloggers lined up to share their tutorials, and I hope you will be blessed by their ideas!

Join us tomorrow for Bonnie's tutorial on this beautiful Christmas Bunting Banner.


There is more to come--I can't wait!